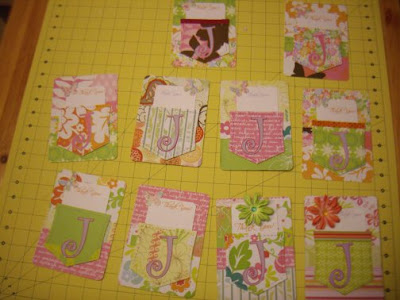
She found several that she liked but the one she really wanted me to make for her is one she found at Splitcoaststampers. It was a cute card with a variety of mixed papers and a pocket to hold the note. We had fun making them and they turned out really cute. I designed a file that we used so we could cut several at one time to save us from cutting each one by hand. The pictures of the majority of the note cards are below. We actually started putting them in envelopes when I remembered that we hadn't taken pictures of them.
If you would like to use the file we created to make the pocket card using SCAL, you can download it here. We would load one sheet of cardstock onto the mat and cut all four pieces - the pocket, the top half, the bottom half, and the belly strap. If we were only making 4 notecards, we would have used 4 sheets of paper, cut all of the pieces from each sheet. After all 4 sheets were cut, we mixed and matched to make up each notecard. We cut the layer with the small notecard that fit the pocket and one larger base to glue all of the pieces to out of white cardstock.
We used different embellishments I had on hand at the top of each small notecard. We printed Thank you! onto the white cardstock before cutting. I used a scrap sheet of paper to determine where the notecard would be cut after it was printed. If you have cri-kut pens, you could probably do this much easier. I haven't gotten those yet, so I'm still relying on my printer and the template method.
Her first name starts with a J so I cut that from 2 different colors of cardstock I had on hand. One was cut at normal and the other at shadow of 2 in SCAL.
If you have questions on assembly, just leave a comment. I'll try to help in anyway that I can.


These are absolutely adorable... I love love them....
ReplyDeleteOh Gloria..these are adorable. I have added you to my bloglist so I can keep up with your latest creations. And thanks for sharing the file.
ReplyDeleteI love these, Gloria, and I'm sure Jordyn does too! You have given me an idea for a Christmas present for my mum - a box of note cards made by me will be sure to go down well!
ReplyDeleteThanks so much for sharing the file too, which I shall download in readiness for when I get my Cricut (soon!).
Have fun in your wonderful cabin.
Thank you! These are sooo cute! Great project and great use of paper without much waste!
ReplyDeleteThank you so much for this post. I want to let you know that I posted a link to your blog in Creative Busy Hands Cricut Freebies Search List, under the Elements post on Aug. 16, 2010. Thanks again.
ReplyDeleteThese are SO AMAZING!!!! GREAT job ma'am!!!!! She has VERY good taste in cards and you'r touch is just beautiful!!!!
ReplyDeleteGloria, these are so PRETTY!!!! Love the new look on your blog too! :)
ReplyDeleteWow....what a wonderful project. And a unique thank you.
ReplyDeleteCongratulations on being our Fab Follower at Shelly's Images. We will feature your blog all week, so drop by and take a peek. :)
~Shelly
Great cards! Thanks for sharing.
ReplyDelete