Saturday, January 1, 2011

Catching Up!

It's really hard to believe I haven't posted here since September!  Time really has passed quickly over the past few months.  It was late September when I really began working on finding a location for our local Christmas Bureau.  Once a location was secured, it was move in time, then we took applications for more than 2000 families, and then the distribution brought us up to Christmas Eve.  It was a hectic time and my blog had to take a backseat behind work and school. 

But, not all was work and no play for me - thank goodness!  I was able to spend time making mini albums for friends of mine.  Here's one of them that I made for a good friend that scrapbooks a lot!  I hope she enjoys adding photos of her family to it over the next few weeks. 

The idea for the album is a variation on one that Laura Denison did during one of her ustream classes.  I changed the binding and the direction of the album pages, but the design of the pages is all hers.  I also did different embellishments and other changes that you can see if you compare hers to mine. 


Thursday, September 16, 2010

Mini Chubby Album

My youngest daughter loves to take pictures of her and her friends.  She puts them on Facebook, prints them and puts them everywhere!!  So, to help her with her passion, I made her a mini album to help record her junior year in high school.  She's got a busy year, involved in a lot of activities, and she takes pictures at everything. 

It's a mini album, but I guess I fed it too much and now it's a chubby, mini album.  I also now know why most folks use an alternate way to bind them rather than their Bind-It-All.  They have a way of becoming a living organism and taking on a life of their own.  Each page is a mat for photos and journaling, then it is also a pocket to hold additional tags to add photos -- and of course, more journaling.

Now, that I've got it finished for her, I have to take her to have the thousand of photos she wants printed.  Maybe this is really all my fault.  Well, I'm Mom - and it usually is. . .

I created several svg files in making various parts of the mini album.  I'll try to get those posted this weekend, just in case anyone is interested in those. 


Wednesday, September 15, 2010

Altered Frame Swap

I haven't posted in awhile and I have so many things to catch up on.  Over at the Creative Inspirations aimoo site, several of us participated in an altered frame swap in August.  I was the blessed recipient to receive the frame made for me by Jill from over at Created By Jill.  The frame she made for me is below. I received it last week, but my daughter has had my camera with her so I couldn't get it posted until today.  Thank you, Jill!  I love the frame you made for me!!


I almost forgot!  I was "fortunate" enough to get to make an altered frame for Penny Duncan.  If you know Penny, you'll know how talented she is, so I have to admit I was a bit intimidated about making something for her.  I changed my mind so many times before I actually got it finished.  It was even a day late!  But, after much fretting, I did get it to her. Here's the picture of what I ended up with. 

Friday, August 27, 2010

Blog Award!

My friend, Celeste from Touched by a Butterfly and fellow moderator at Creative Inspirations honored me by giving my blog an award.  I am truly humbled to be included in the list of greats that she gave the award to.  As part of the award, I am to let folks know why I started a blog in the first place, and why I continue to blog. 


I started my blog in January of this year as a way of sharing svg files.  The first file I created was a Gerber daisy and so many people from the Scalhints yahoogroup wanted it that I got behind on emailing it out to them.  The only way to get it to everyone that asked, was to create a blog and put the file there.  My hubby also had built me a cabin to study (I'm in school) and to spend time with my crafty side so the blog became a way to share my cabin with the rest of the world.

I continue to blog so that I can continue to share any svg files I create so that others can also enjoy them.  I don't make them as often as others do because I have too many other hats that I wear in my life.  I keep thinking I'm gonna lay some of those other hats down, but they are still there.  I also blog because when I find a site that I want to follow, the blog keeps up with all of them so I can visit often.

Now for ten trendy bloggers that I visit often and who also inspire me with their lives and creations - and who display their talent, time, and creations on their blog:

1.  Wendy at Wendy's Crafting Times
2.  Rita Loyd at Rita's Country Creations
3.  Tammy Jennings at OBX Stamping and Crafting
4.  Brandi Crimminger at Creative Happenings
5.  Wanda at Wanda's Crafts
6.  Becca at Amazing Paper Grace
7.  Laura at Cricut Card-iologist
8.  Christy Hund at Creations by Christie
9.  The ladies at Stampin Sisters in Christ
10.  Stephanie at Digital Designs by Stephanie

Thanks again to Celeste -- You really made my day!

It Might Be a Sunflower . . .

Happy Friday, everyone!  Over at CreativeInspirations we have gone a little nuts over flowers.  Everyone is making flowers for cards or other projects and I have to admit it is a little contagious.  Penny Duncan is busy as a bee producing flowers and we've all gotten in the act by making our own creative versions of them.  If you haven't seen all of Penny's latest creations, stop by her blog. Whether it is a rose or hibiscus you are looking for, she's got them all ready for you to download and start making your own.

I have a project I am working on for a friend and I wanted a flower that I created myself.  I started working on this file with no real flower type in mind, but now that it is complete, it resembles a Sunflower.  But since Sunflowers are yellow, I can't really call mine Sunflowers because I have more colors in mind than the ones I have even gotten made.  So. . . what should I call it?  Take a look and let me know what you think -


If you want to make some of your own, you can download the SVG files here.  If you haven't stopped by CreativeInspirations, come on by - we'd love to have you join us!  And, I'd like to thank you for stopping by the Lil Cabin -- it's been a pleasure to have you here.

Thursday, August 26, 2010

My Blog Candy Has Arrived!

A couple of weeks ago I was surprised to be the winner of the blog candy from Tammy at OBX Stamping and Crafting.  Today, the blog candy arrived and I just had to show you all of the goodies that Tammy sent my way. 

There were a lot of goodies as you can see in the photo above, but my favorites are the magnet she made with the summer scene and the notepad decorated with the sweet bluebird and sentiment.  Can't wait to get a photo in the frame out in the lil cabin.  Thank you Tammy!! 

Be sure you stop by Tammy's blog and see what she's been working on lately for Halloween.  She's got some really cute cards and the most darling treat bags.  I know you will be wanting to make some of your own.  I know I am!

Sunday, August 15, 2010

Thank you pocket cards

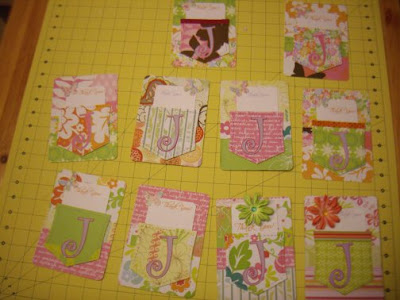
My youngest daughter recently turned 16 and many of our family and friends joined us as we celebrated her life.  They showered her with gifts and she was so excited to have gas money to use once she was able to get her license the following day.  She wanted to send thank you notes to the family members that came or sent gifts, so she visited some of my internet bookmarks in search of the perfect cards.

She found several that she liked but the one she really wanted me to make for her is one she found at Splitcoaststampers.  It was a cute card with a variety of mixed papers and a pocket to hold the note.  We had fun making them and they turned out really cute.  I designed a file that we used so we could cut several at one time to save us from cutting each one by hand.  The pictures of the majority of the note cards are below.  We actually started putting them in envelopes when I remembered that we hadn't taken pictures of them. 


If you would like to use the file we created to make the pocket card using SCAL, you can download it here.  We would load one sheet of cardstock onto the mat and cut all four pieces - the pocket, the top half, the bottom half, and the belly strap.  If we were only making 4 notecards, we would have used 4 sheets of paper, cut all of the pieces from each sheet.  After all 4 sheets were cut, we mixed and matched to make up each notecard.  We cut the layer with the small notecard that fit the pocket and one larger base to glue all of the pieces to out of white cardstock. 

We used different embellishments I had on hand at the top of each small notecard.  We printed Thank you! onto the white cardstock before cutting.  I used a scrap sheet of paper to determine where the notecard would be cut after it was printed.  If you have cri-kut pens, you could probably do this much easier.  I haven't gotten those yet, so I'm still relying on my printer and the template method.

Her first name starts with a J so I cut that from 2 different colors of cardstock I had on hand.  One was cut at normal and the other at shadow of 2 in SCAL.

If you have questions on assembly, just leave a comment.  I'll try to help in anyway that I can.